About Me

My photo
Hey, it's Chelsy, with a Y! I am a wife to my sweet prince, and mother to one spunky little princess and one handsome little ham of a prince. Painting is my drug of choice. Wine is good too. I'm known to speak without thinking and eat to much chocolate. I love meeting new people, and learning new things. So this is my journey through some not so glorious moments, some not so intelligent thoughts and some possibly crafty ideas.

Total Pageviews

Powered by Blogger.
Powered By Blogger

Sunday, January 23, 2011

The Mantle a la` Valentines

Little Miss Beth over at The Stories of A to Z is having another mantle party, YAY! I am very excited to show of my VDay Mantle, so without further adieu:

Here she is in all her glory! And I must say, I am LOVIN' my Valentines Day mantle. I don't know if it's my new blue paint, Woodlawn Blue Angel by Valspar to be exact or...

...My "Be Mine" banner that I made from some old wood I found in my moms burn pile (I think it used to be some sort of border for a flower bed? I just free handed the letters with watered down red paint, because I wanted it to look a little faded and rustic and added a little pink paint to my heart)...

 ...It could be my heart bouquets made from items from the Dollar Tree...
 ...Or my Dollar Spot mailbox...
 ....Maybe my book heart is my favorite?
 ...Or it could be my conversation heart ball, and my cute framed picture (minus the glare)...
 ....Actually, I'm pretty sure my favorite thing about my mantle is my cupcake wrapper wreath.
 Hmmm... I guess the whole darn thing is so stinking cute I can't decide what my favorite thing is! I am very proud of my little mantle, but it might be my cold meds making me a little delusional :)
Happy Valentines Day Y'all,

Hop on over to the party and join the fun:

Tuesday, January 18, 2011

The ULTIMATE Hair Bow Tutorial

I have literally had this post in my drafts for over a year. I. KNOW. I have craft shame. It's one of those things that you just do without thinking about and then realize that other people might like to know how ya do whatcha do. So here goes part one of my series, I'm going to try to post a new hair bow tutorial at least once a week until I run out of different types.

This first bow is probably known to most of you a "Boutique" bow, but I think the way I do mine is different than the right way. Hey, that's me....always gotta be the odd ball! (Please excuse these bad iPhone pics. My birthday is in March, can you guess what's at the top of my list? ;)


You likey? Want one? Or ten? Here's what you do:

First, gather your supplies.

 You will need some-
*Ribbon (I used grossgrain 1.5in. I find it the easiest to work with, but any kind will work)
*Needle and thread
*Lighter or fray check
*Yard stick
*Hair clip
*3in of 3/8in coordinating ribbon
*3in of 5/8 or 7/8 in coordinating ribbon
*Hot glue
*Scissors
*Straight pin
 Now that you have all your goodies gathered, take your 1.5in ribbon and cut (2) 12in pieces.

Take one piece and make a circle and do a running stitch through it.

Then make a crease in the middle of your ribbon.. Make sense? Here's a pic, I hope that helps.

I'm right handed, so if your not then do the exact opposite of everything I'm about to tell you! With your left hand holding the ribbon, take your right hand and twist the crease around until it's parallel with the ribbon, making a figure 8. It should look something like this:
Then do a running stitch through the middle and pull it tight. Wrap your thread around a couple of times and tie it off.  (Sorry I didn't get a picture of this step.)

Do the exact same thing with your other 12in piece of ribbon.

When you have 2 figure 8's all you do is tie them together. I used wire so you could see it, but thread will hold it just fine.

Then take your 3in piece of 5/8 or 7/8 in ribbon (I used 7/8in) and tie it in a knot like so:

Place the center of the knot on the front of your bow and glue it around the bow. Take your 3/8 in ribbon and glue it around your clip. Sorry I didn't get pictures of this step either, but if you've made any sort of hair clip before then you already know this step. If not, email me and I will send you instructions :)

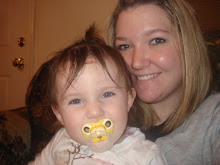
After everything is done you should have this little cutie to show off!

Now all you need is a little princess to attach your bow to! I have one out for loan if you need her! ;)

Stay tuned for Pinwheel bows and double boutique bows coming at the end of the week :)

Linking to these fab parties:
All Things Heart and Home

Make it Yours @ My Backyard Eden

Tuesday, January 11, 2011

The Paci Pal

Hello Peeps! Have I got something fun for you today! Here's the pitch- Are you tired of losing pacifiers? Or having to dig around to find them in your diaper bag or car seat? Do you have pacifier clips but lose those too or forget to put them on your pacifier? Yeah... me too!! Enter The Paci Pal-

Isn't he adorable?

Have you seen the "Binky Buddy" online anywhere? I first saw them on Etsy and thought they were adorable! But they are anywhere from $15-40, seriously. So I decided to make my own. FOR FREE! And, guess what? You can too :) I'm calling it a Paci Pal because my hubby is against calling them "binkies". He says "It's a pacifier, not a binky." (He's weird;)

All you need is a small stuffed animal. The flatter the better. I used a Beanie Baby and cut him open in the belly and took some of the beanie out.
Your also going to need:
4in piece of ribbon
1- 1in piece of velcro. (I don't know velcro etiquette but, the rough and soft side)
Seam ripper
Needle and thread

First take your velcro and sew it onto your ribbon. Sew one 1in piece at the very end of the ribbon, then sew the other piece at your 3in mark. You should have one inch of velcro, one inch of ribbon, one inch of velcro, one inch of ribbon. Make sense? Good!


Now, take your seam ripper and rip the thread out around your pals mouth. I know it sounds brutal, but they don't mind :)

And rip about one inch open:

*Disclaimer- Yes, I know I have a fat thumb. It is short and stumpy and completely different than my other one. Everyone makes fun of me and calls it a toe. Sorry if it grosses you out ;)

Then take the end of your ribbon that doesn't have velcro on it and stick it in his open mouth until you are about 1/4 in away from the velcro piece, and sew it shut. I sewed mine a little to the side because I thought it might be a little bit easier, but it doesn't matter.


Give this sweet cutie to your little one and watch how excited they get! Isn't it adorable? Oh, and it also helps develop hand/eye coordination so bonus points! I hope you will try to make one of these for your little one, or friends or family. They really are super easy and so cute. Enjoy!


All Things Heart and Home

Monday, January 10, 2011

The mantle

My current mantle is in-between themes. It's a little bit wintery, a little bit spring-ish, a little bit Valentines, and a little bit rock-n-roll. Well, maybe not.


Here's the rundown- The mirror above has our last name on it with Families are Forever over top of it. What? You can't see it? There's a glare? Oh yeah, that's because I'm such an awesome picture taker....NOT! Sorry peeps;) The mirror is from Home Interiors (I don't think it's called that anymore) and it's probably as old as I am, but it was a hand me down from my Grandma so I love it. I added the vinyl to it last year, and I really want to paint it but i'm scared and can't decide on a color, so for now it stays as is.

I picked up some pine cones outside and put them in a jar, and scattered them across the mantle. I left my green garland up there from Christmas to give it a little more natural look. I used some moss and porcelain eggs to make a "nest" and put a chubby little bird on top. We'll call her Gretta :)


The Love rock was a wedding gift from back in the day. I think it's for a flower bed or something but I liked it and it kept with the natural theme.  The dogwoods are from the next shelf over. They needed some new scenery so I obliged.

That big honkin' pine cone was one that my hubby brought me from East Texas. Have you ever seen one so huge? I love it! Look how little and sweet my princess is in that picture! Ugh.... why do they have to grow up? My twine tree was made last year, I just added a brown bow to it. I guess that's about all my little mantle has to offer for now :) Beth over at The Stories of A to Z is having a winter mantle linky party, you can find me there! 

Click on the picture below to go directly to the party. There are a lot of great mantles linked up.
Stay warm,

Tuesday, January 4, 2011

Before and after...and after!

Happy New Year peeps! I just finished my first before and after of the year, kinda. It's definitely an improvement, but I know it has more potential. And that's where you wonderful people come in! First let me give you a little back story on this monstrosity in my living room. It's huge. Like steroid huge. And bulky. And I DO. NOT. LIKE. IT. There. That's my little fit over our entertainment center. I will grow up now and act somewhat like an adult.  But seriously, I don't like it. And I have no idea what to do with it. Oh, and did I mention it matches NOTHING else in our living room? Yeah, nothing. 

This is the only picture I could find of the thing with nothing on it. Sorry it's horrible, and you can't see half of it. But you get the idea. Oh, and we have a TV from the 90's, seriously. Yes, I would love a new flat screen, but this ol' sucker is still kicking so I can't really see the point in buying a new one. Hubby doesn't agree with me on that though, he also likes the entertainment center. Ugh!

It's gotten so bad that I've considered tearing it apart. Or taking the saw to those shelves so it's not so big. Paint, maybe? I can't even hardly watch movies anymore because I keep staring at the shelves wondering what to do with them. Yeah. I know! Can we say obsessive?

Here it is after I decorated it. What do you think? I have no idea what to do with it. If you have any suggestions or ideas for it please let me know.  There really is no function to it, or balance. I am not good with that stuff, but I know a lot of people in blogland are so please help me!

Here are a few close up pics of the shelves. I just shopped the house, used scrapbook paper, and twine and decided I could live with it. I know it could use some improvements though.


So, whatcha say? Wanna help? Do you have any piece of furniture in your house you hate? Please tell me I'm not the only one :)


Linking to TDC's Before and After party, you should go check out all those amazing projects!

P.S. Sorry about the glare in all these pictures. It's a sunny 70 degrees in these parts. Sorry if your stuck in the snow. We certainly are not!