About Me

My photo
Hey, it's Chelsy, with a Y! I am a wife to my sweet prince, and mother to one spunky little princess and one handsome little ham of a prince. Painting is my drug of choice. Wine is good too. I'm known to speak without thinking and eat to much chocolate. I love meeting new people, and learning new things. So this is my journey through some not so glorious moments, some not so intelligent thoughts and some possibly crafty ideas.

Total Pageviews

Powered by Blogger.
Powered By Blogger

Monday, December 21, 2009

Busy Little Elf!


I know I am far from being the only person that is busy this time of year, but it sometimes feels like it! There are so many things I want wanted to do and make for Christmas this year, but with family parties, birthday parties, extended family parties, church parties,  oh and did I mention an ER trip(Yes it was my first, and quite traumatic!), I just ran out of time.


Here is our tough little lady when we got there...

She wasn't even scared! (I was)

Here she is after, a little upset...Poor baby. But no stitches, YAY!

I was really stressed about it until I spent some much needed quite time this morning in prayer. I realized that it doesn't matter what gets done, or doesn't get done, I should be thankful that I have an AMAZING family to spend Christmas with. And they don't care if our wreath isn't quite straight, or there are still ornaments in boxes that didn't make it to the tree, or the bows on the presents aren't as pretty as I would have liked. They only care that we spend time together rejoicing in Jesus' birth, drinking hot chocolate around the tree and singing our favorite Christmas carols. So I'm going to enjoy the rest of this week, and if a dessert or two doesn't get made, and we have leftovers for dinner everynight this week I'm going to laugh and thank the Lord. And you should too! I hope you all have a wonderful Christmas and get to spend so much needed quality time with your family also. See you all after the New Year!

Oh here are a few pics I wanted to share of "The First Ever Phillips Family Gingerbread House" (yeah say that one five times fast:)


She was saying "CHEESE"! Silly girl!

Merry Christmas Y'all,


Thursday, December 17, 2009

{Three Word Thursday}

Luke 2: 11-12
(1)   (2)    (3)  :)

Wednesday, December 9, 2009

....the lights outside!

I'm not going to bore you with all the details of our Christmas lights outside, so here are a couple of pictures for your looking pleasure :)


Less is more, right?! It was cold and raining so the lights got the shaft, but we still have the prettiest house on the block:)

Happy Wednesday,

Thursday, December 3, 2009

Meet (some of) our Christmas Decor...

I have been trying and trying to get all of my decorations up and done before this weekend so I could show them to you wonderful people...But I just don't think I am going to make it (sigh :/) Then I remembered this post from the very witty Chris over at JAG. She's a genius, and the answer to my decorating crisis. There is nothing I love more than seeing crafty, talented bloggers not have it all together;)(That's mean, isn't it?!)
Anyway-Here are half of my Christmas decorations, Enjoy!

This is our tree, Christi. She's only wearing half of her "clothes" (ornaments ;) But...to my shock and utter dismay, she has all of her "children" (presents;) sheltered close under her arms. This usually never never happens until right before Christmas. You see Christi is a little irresponsible and usually has all her kids scattered in stores all over the state. (Some are possibly even in other states...YIKES!)


Here's is our wreath:

She is finished, but I am not lovin the bow so therefore she made it into this post :)

Our Mantle:

I don't even know where to start with him. The stockings are hung, for now, they will soon be coming down to be named. And everything else is just kinda thrown up there until it finds it's new home. (Who knows where and when that will be...) I need to figure out something to add dimension and depth. I have a few empty boxes to wrap and add big pretty bows too, but other than that I don't have a clue. Can you help?? Any ideas are welcomed with open arms :)


And finally...THE table:

Yeah, that's pretty much it...My beloved Christmas plates, and a table cloth. I can't decide what to do for a centerpiece. IDEAS PEOPLE??!!!

I am also anxiously awaiting my countdown blocks from Scribble It. Yay!! Anyway-I hope you enjoy half of my decorations :) Stay tuned for the other half...Happy Thursday to you all.

Thursday, November 26, 2009

Tuesday, November 24, 2009

Family Wall Art

Do you have some wall space that needs updating? Want to make some wall art for it on the cheap? In like...oh...lets exagerate for dramatics sake and say 30min? Here you go...

(I'm not sure why my "a" is dark in every picture, maybe there's a new camera in my near future...cough, cough, wink, wink hubby;)

Here's what your gonna need:
*6 Frames in different sizes, shapes, ect.
*Letters to spell out "Family"(or whatever word you want;) in different fonts and sizes. You can use vinyl or print letters off of your computer.

All you have to do is cut out your letters and put them in the frames, EZ PEAZY LEMON SQUEZY!  I encourage you all to use your imaginations when doing this project, because the possibilities really are endless. I chose to make mine look like floating frames, the way I did that was MOD PODGE baby! I just put a coat on the back of the glass, placed the letter down, let it dry then added another coat to seal it. I put a glue in each corner of the frame to hold it in place then hung them up. I didn't want to do anything too permanent, just in case I change my mind :) You could use coordinating scrapbook paper and lay your printed letters on top. Or you could cut your letters out of scrapbook paper and use them in floating frames. See...endless possibilities :) If you make this project send me your pics so I can admire all your creative abilities! I'm linking up to DIY Day, there are so many fun things over there, so if you get a chance check it out. ONLY 3 MORE DAYS UNTIL THANKSGIVING!!! I'M SO EXCITED :)


Happy Monday,

P.S. I spent a wonderful weekend with my family this past weekend, which was my inspiration behind this project. I am so thankful to have such a great family, aren't you? :)

Thursday, November 19, 2009

Three Word Thursday

***My sweet hubby recently informed me that I "talk to much" (Who? Me?!) So in light of his very thoughtful statement I have decided to start "Three Word Thursday". Feel free to leave me a comment with your "three words". They can be what is going on today, or how you are feeling or something the kids said, anything, but only THREE words :) And FYI- this is just a explanation...not my actual post...thank goodness ;D***

LAUNDRY. LEFTOVERS. FEATHERS!

Have fun!

Monday, November 16, 2009

Shame, Shame...I know your name! AND A WINNER (kinda)!!!!

I know what your thinking, and your right...I am such a SLACKER! And like any great slacker, I have some awesome excuses. First of all- We had one of many Thanksgiving dinners on saturday, it was a great day spent with lots of family and too much pecan pie! Excuse B- My "Project" for friday was going to be something for the kiddo's to make. I was up late thursday trying to get said "project" finished, only to run out of one of the necessities needed. And since I can't just run out and buy more, I was at a loss. (I will try to think of something else to use and post later in the week:) So there you have it, you have to admit...they are pretty good excuses aren't they?!

The next order of business is to announce the winner of my very first GIVEAWAY! YAY! I was a little discouraged about the turn out to my giveaway, and I think it might be a little to early in my blog career to have another.  But,  the six comments I did recieve were so sweet and very hard to choose from.  So I did what any gal would do... I wrote down your names and let Little Miss draw out of a hat. You will never guess who she drew- her Aunt Ang!! I promise this was not rigged, she really did pick her.  I will post a picture later to prove it (sry, my camera batteries are dead-AGAIN:) And since Auntie Ang was so sweet in suggesting that our Grandma would love this watch, I have decided to give it to her. (If it's ok with the winner, of course!)

So, now that

Friday, November 13, 2009

Great Neighbor or Teacher gift

I know...I know... I said I was going to post a new tutorial every day this week, but don't call me a  slacker just yet! I got ALOT of Christmas presents made and am very proud of myself for being one-step ahead!

So on to today's tonight's craft:

I know you have probably seen these everywhere, but I L.O.V.E. them, they are so super easy to make. They are also cheap, and take no time- which is something I adore :)

In fact these puppies are so easy, that I didn't even take pictures, during the process. But don't sweat it, you won't need them.

Here's what your gonna need:
* Composition Book
*Scrapbook paper, or fabric
*Mod Podge
*Embellishments (i.e. Ribbon, flowers, paint, stickers, chip board, anything you want)

The Composition Books can be found at the Dollar Store for $1. They also have little comp. books that come in packs of 2, they would make cute stocking stuffers, or "just because" gifts for the kiddo's to put in their backpacks.  I'm sure you have the rest of the ingredients on hand. If not they are cheap too.


Here's what your gonna do:
*Pick out 2 pieces of scrapbook paper, (One for the front, one for the back. They can match or coordinate, but don't have to:)
*Coat the back of the notebook with Mod Podge and slowly lay your scrapbook piece on the back where one edge is lined up with the black band, and the other is somewhat flush with the top. You should have extra paper hanging off the bottom and the opening of the notebook.
*Smooth out any wrinkles of bubbles in the paper. (I use a rolling pin) And let your Mod Podge dry for about 15-20 min
*Now you can either trim off the extra paper, or fold it over and Mod Podge it to the inside. If you cut it off then go ahead and add a layer of Mod Podge on top of the back piece of paper to seal it. If you chose to Mod Podge the extras to the inside then wait for them to dry, then add a top coat.
*Then repeat the previous steps for the front of the notebook :) Easy peasy, right?! I know it seems like alot but it really isn't.

Now that your notebook is covered and oh-so pretty, you can give her some accessories.
The one above is a little something I made for my Aunt. She's down in Houston right now kickin some cancer butt, so I kept the acc. to a minimum so it wasn't to much. Use your imagination and consider the person you are creating for.
All I did was sponge some brown paint around the edges, added a little "D" to the bottom and glued a ribbon around it so it will tie closed. That's it :)

Now-If you want to add a little something extra to it, You can make a cute little flower pen, and some "book markers" like these:


To make a pen- Find a flower you like, that matches or not, whatev...
Get a Bic pen and remove the stopper thingy (That's what they are called, isn't it?!) on top.  Trim your flower to where there is only about a 1/2 an inch left of the stem and hot glue it inside the hole at the top of your pen.
Then take some ribbon, or fabric, or I used twine and glue the end of it underneath the flower, then wrap and glue, wrap and glue, wrap and glue all the way down to the bottom :) (Boy, I really hope there aren't any pro's out there reading these directions, they might get me in trouble with the writing police...Sry ;)


All I did for these little cuties is take some clothes pins and Mod Podge some coordinating paper on the tops and bottoms. Use the same techniques as you did when making the notebook.

Then you have a cute little set to keep for yourself give to someone special! Now go make 20 and send me your creations, just kidding, 15 will be fine ;)


I hope this tutorial was somewhat comprehensible, please forgive me, it's late! If you have any questions, just let me know.

Happy Thursday Friday,


Tuesday, November 10, 2009

Make It With Watcha Got- Part 2

Photo Jewelry Ring

I'm sure many of you have seen these photo necklaces: This one is beautiful and only costs....$49. This may not seem like alot to some of you, but for this frugal gal, it's too much :)


Here is mine that was free: I know it's not as pretty as the one above, but free is always beautiful in my book!


Wanna make your own? Here's what you will need to make a ring: (I'm sure all of you crafty people out there can use your imaginations to make a necklace, bracelet or whatever floats your boat. I wanted a ring, so that's what I made :)

*Some tiny seed beads, *a keyring, *small photo (I resized my photo to 2X1, some photo packages even come with these tiny photo's so if you never knew what you would use them for, now you do:), *stretchy bead cord, a thick/sturdy piece of plastic (I cut mine out of an empty apple juice bottle), *marker, *hot glue, *cardstock, *and some beads or rhinestones. (I also used tweezers for my beading because I have fat fingers, but you don't have to. I'm sure you have perfectly normal, beautiful fingers ;)


(I was kinda flying by the seat of my pants while making this project so I didn't get pictures of every step,  if you have any questions please let me know!)

Step One:


On the plastic and cardstock pieces, trace the outside of your keyring, and on the back of the photo trace the inside of your keyring and cut them out. Use some Mod Podge, or a glue stick (either works fine) and glue the plastic piece on top of your photo. Put the cardstock aside until the end.

Step Two:
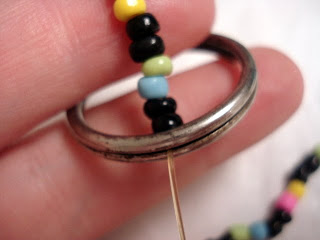
Tie your beading cord around your keyring. You can slide it in between the two rings and tie a knot for a more secure hold.

Then measure about 10in and cut. Bead your string in whatever colors you like all the way down until you get about 1.5-2in from the end and tie a knot, about half and inch away from the last bead, so they have room to move.

Then take your keyring and lay it flat on top of the finger you are going to wear your ring, and bring the "tail" of the beads around/under your finger to where it is snug and slide the string trough the keyring and tie a knot. (Does that make any sense?)

Keep doing this until you have three strands to wear. It should look like this:
Step Three:
Okay, so you have the "ring" part finished, now you need to add your rhinestones, or buttons, or ribbon, or whatever you want to use to embellish, around the top of the keyring. I used these rhinestones and some hot glue, but any kind of sturdy glue would work fine, I was just using what was handy :)

I also added some thin (1/8in) ribbon around the outside of the ring because it was kinda worn.

Step Four:
(This is where it gets tricky because there are NO photos! I will try to use my best descriptive writing skills, but please let me know if something isn't clear)
Now you are going to add your picture. Your Mod Podge should be dry by now so take your picture and cut off the extra plastic around it. Then take your photo and place it on the bottom part of the keyring and press it up until it is snuggly in it's new home. The edges of whatever you used to embellish should keep it from popping all the way through. Then take the cardstock and glue it to the bottom of the keyring to cover the picture and keep it from popping out.  Then your done, and it should look something like this:

(sorry for the glare)
So there you have it, your own photo ring! There are so many other things you can do with this idea, but I was using what I had at midnight last night. Most craft stores have the jewelry frames already packaged and ready to go, you just add your beads. Use your imagination and be the crafty person you are to make one all your own :) I'm gonna link this up to Kimba's DIY Day


Don't forget about my giveaway below- it ends on Saturday so be sure and enter soon!

Happy Tuesday-


Monday, November 9, 2009

"Watch" what I can do!


Here is a easy and cheap gift that any girl would love! It only takes about 20 minutes (or an hour if your indecisive like me:) to make and it is instant cuteness! I didn't buy anything to make this watch, I just "shopped" the house. (I am apologizing in advance for the picture quality, don't hold it against the watch, it's not her fault ;)

Here's what your gonna need: An old watch that's lost it's pizazz, some stretchy bead cord, beads, hot glue, and a long needle (maybe one used for needle point)

Heres what your gonna do:

Take your needle and push the pins out of the spot that holds the band on both sides.
Then if your watch looks like the picture above, replace the pin, without the band. And it will look like this:

If your watch looks like this after the band is removed, leave it alone:
Now take your stretchy cord (you can use regular bead wire if you want, you will just have to attatch fasteners at the ends) and loop it through your hole or pin and tie it off. Make sure you have two tails, long enough to fit your wrist plus 2in to tie off the other end.

Then add your beads all the way down both strands until you get two inches from the end

Be creative while doing this step and consider the person you are making the watch for. You can do school colors, or favorite colors, make a pattern, or just string whichever bead you grab. Then bring you strands under and over (to make a band) and tie them off on the other side just like you did before.

Give her a little cleaning to make her shine, and that's it, your done! Isn't she pretty? You can put a little spot of hot glue over your knots just to make it a little more secure, but they are fine without it.

You can find tons and tons of inexpensive watches at garage sales or thrift stores with beautiful faces, and not so beautiful bodies ;) You can also make more than two strands, just tie more cording around your pin. Or you can make a few bracelet type strands of beads with two clips, one on each end, and clip them to the pins of the watch to make a interchangeable band. The possibilities are endless, and this is such a easy and cheap project that you can afford to use your imagination!
I am linking this up to JAG's "I can make that" party. There are so many great and inexpensive ideas over there for Christmas, so go check it out!

Leave me a comment telling me why you want/need one of these watches (Thanks Beth for the idea, yours was so much fun, I just had to steal copy it:) and I will choose a winner on saturday, not randomly, I will pick the one I like best, cuz it's MY blog and I can!! Don't forget to come back tomorrow for another easy jewelry project (not sure why i'm on a jewelry kick all of a sudden?!) with stuff I shopped the house for!

Happy Monday-